Overview
Defederating your GoDaddy account is possible without involving GoDaddy customer support. It is important to follow the below steps in order, as it is very specific and crucial to avoid data loss.
Prepare your users
Users will be required to change their passwords after defederation in order to login to their accounts. It is required to change all users’ passwords after defederation to ‘activate’ the account and allow them to login again. For smaller implementations, this can be done manually by an admin and then the password supplied to the end user (optionally set a temp password and require password change on first login). For larger implementations there is a PowerShell script that can mass reset all passwords, but requires a CSV input. Those instructions will be provided below after the defederation steps.
You can create the CSV file ahead of time to provide your users with the passwords they will need to use after defederation. You’ll want to create a CSV template with the following two headers: “UserPrincipalName” and “Password”. It does not matter what is entered in the password field as long as it is not blank. Generally capital/lowercase & some integers are ideal – but the user will be changing this on first login.
Become a Tenant Admin in GoDaddy
Be sure that you have access to the admin@NETORG123456.omicrosoft.com (or similar) account. If you do not have these credentials, do the following:
- Login to https://portal.azure.com/ with the admin user that was set up when the GoDaddy account was first created.
- Click on Azure Active Directory, and then Users.
- Find the admin@???.onmicrosoft.com. Click on the user and reset their password. Open a new tab and login with this new password, change it as required for first time login, and keep that password safe.
Remove Federation with GoDaddy
Be sure your users have their post-defederation passwords before running the steps below.
Perform the following steps from an elevated PowerShell session:
Write-Host “Checking for MSOnline module…”
$Module = Get-Module -Name “MSOnline” -ListAvailable
if ($Module -eq $null) {
Write-Host “MSOnline module not found, installing MSOnline”
Install-Module -name MSOnline
}
Connect-Msolservice
# Enter the admin credentials for the “admin@???.onmicrosoft.com”.Get-MsolDomain
# See that the domain is “federated”Set-MsolDomainAuthentication -DomainName “” -Authentication Managed
# Enter the domain from the previous step between the quotes. All domains in the tenant need to be in a managed state for this to work, even ones that are no longer being utilized.Run Get-MsolDomain again to confirm that your domain is now listed as “managed”.
Reset Passwords
Passwords can now be reset manually (https://admin.microsoft.com/ -> Active Users -> Click & reset), or you can use the CSV file created previously. To use the CSV file, perform the following steps from an elevated PowerShell session:
$credential = Get-Credential
# Enter your admin credentials
Install-module Msonline
Import-Module MsOnlineConnect-MsolService -Credential $credential$UserPath = Read-Host -Prompt “Enter File Path For CSV list of users”
# Define location of your CSV file. Ex: c:\users.csvImport-Csv -Path $UserPath |%{Set-MsolUserPassword -userPrincipalName $_.UserPrincipalName –NewPassword $_.Password -ForceChangePassword $True}
# resets the passwords for all users
Add Nimbus Logic as your CSP Provider
Now that the tenant authentication method is set to “Managed” (defederated), you can accept the CSP relationship invitation from Nimbus Logic. While logged in as a Global Admin, click the following link to accept and authorize Nimbus Logic to be your CSP.
Order licensing for your tenant
Let Nimbus Logic know what licenses you will be using once defederated, and we can assist in provisioning your licenses. If subscriptions are not changing, simply provision the same number of licenses you have currently, remove GoDaddy as delegated admin, and cancel with GoDaddy. No further actions are required.
If the subscriptions (license types) are changing, provide Nimbus with your new requirements. Once the licenses are available, they can be assigned to the users (bulk assign the new licenses, remove the GoDaddy licenses). Once that is complete, remove GoDaddy as delegated admin & cancel with GoDaddy.
Remove GoDaddy as Delegated Admin & Cancel Subscription
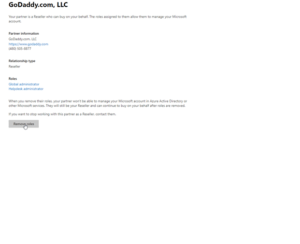
It is imperative that GoDaddy delegated admin access is removed prior to canceling your subscription. When a subscription is cancelled with GoDaddy, they automatically remove (DELETE) all licensed users.
- Navigate to https://admin.microsoft.com/
- Go to Settings à Partner Relationships à Click on GoDaddy, and then “remove roles”.

